EQ is a simple tool that is incredibly versatile. It generally serves 3 purposes and you may use several different instances of it on one signal chain to serve these purposes. Generally it can be use for:
- Cleaning up - editing out harsh frequencies, unnecessary frequencies (sub 30hz for example) room resonance or tempering phase issues
- Tonal EQ - make audio sounds awesome by boosting or cutting certain frequencies
- Creating separation - ensuring every instrument has its place in the mix and sounds good with everything else
Before jumping in, let’s quickly cover the controls in an EQ:
- Different shapes - they serve different purposes but should be self explanatory. The main ones are shown below
- Frequency - the focal point of the shape you are using
- Q (width) - what frequencies around the focal frequency will be affected by your moves
- Gain - how much the volume goes up or down at that frequency
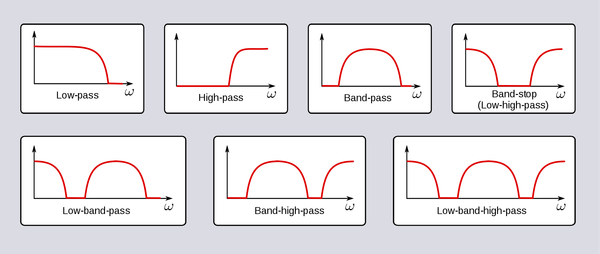
Image above taken from https://www.masteringbox.com/filter-types/
1. Cleaning up:
Let’s use a vocal to demonstrate this.

First we might use a high pass filter to filter out the sub 100hz mark (which adds nothing to the tone but takes up precious headroom and could make the mix muddy at high volumes).
For getting rid of harsh frequencies or room resonance, you turn the Q to circa 6-10 and then pump up the gain to 6-9db (don’t go too high). From there, sweep through the spectrum until you hear it resonating (it suddenly jumps in volume and makes a horrible sound - you’ll know it when you hear it, it is like a whistling noise). You can achieve a similar thing by using any frequency soloing functionality your EQ has - choose whichever approach works best for you.
When you’ve found the spot, play with the Q value until you are happy you are focused on the resonance only (as much as possible). Then, once you are happy put in a cut of 1-3db. You’ll need to listen as you bring the gain down - when does the resonance disappear? Leave it there. You've gone too far if the vocal now sounds a bit odd/processed. At this stage, it should just be making it sound more natural and less like it was recorded in a weird environment. My experience is that, once you’ve heard the resonance at 6db, it is much easier to hear it in the mix so this is actually simpler than it sounds to do.
You'll likely have a few spots where this resonance occurs across the whole frequency spectrum. This happens because in most home recording environments, you are recording in a small space where the sounding bouncing back off the walls and objects comes back quickly and is therefore quite loud. This is particularly common in the low-mids as these frequencies have a wavelength that tends to work against you in a small room. Resonances tend to be in the same place for the same vocalist so, if it is your own music, you will get a sense of where to look over time and how much cutting is needed.
2. Tonal EQ:
This is all about dialling in awesome by boosting frequencies that make it sound good and reducing/cutting frequencies that make it sound bad. Essentially, here EQ is a key part of your sound design stage. You may have a beautiful guitar tone when recorded in solo but in the context of the mix, it sounds dull. In this case you may put in a booster shelf around 3k mark to add some top end air.
Top tip: do wide boosts and narrow cuts. This will sounds more natural.
Here are some examples from my productions. When doing bass synths, I tend to do a hefty 3-5db boost in the 5-12k region. This is just a stylistic thing but I find it gives the bass synth a lot of presence and enables me to fill out a whole track with just bass synths and drums. I also tend to boost the 100-400hz area a little as I like to make my bass a bit more bassy. The below image is taken from an upcoming release called "what the funk".

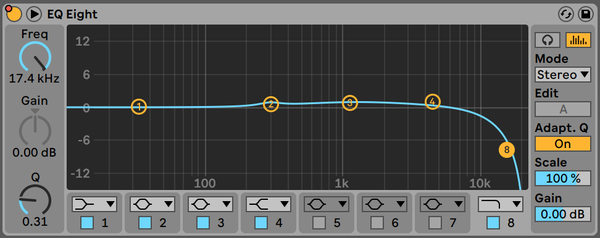
However, on sawtooth bass lines where I will have a lead/chord synth over the top, I’ll use a low pass to roll off 5-20k because those frequencies are very buzzy in a sawtooth synth. The below one is taken from an upcoming release called "on point".
3. Creating separation
EQ is one of the ways you can create separation in a mix (others are pan and depth effects). By separation, I mean that every instrument has its own place in the mix and can be heard clearly. I always start with EQ before going on to using the other tools (pan/reverb/etc) as I believe it to be the most important.
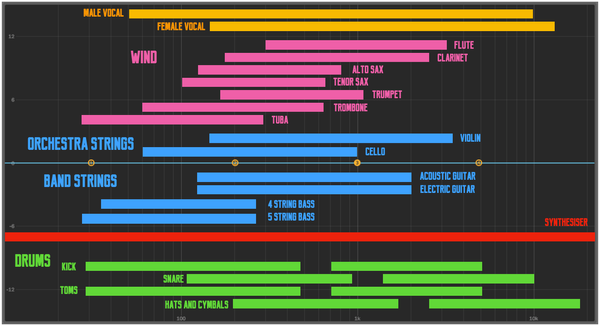
Before we jump into EQing for separation, it is important to note that different instruments occupy different parts of the frequency spectrum. The below image shows the focal areas for a variety of instruments you might be using in your track. This is why arrangement is so important in getting a professional sound. If you have too many of the instruments that cross over here in your mix, you are going to have one complicated separation exercise on your hands. When I am producing my music, I try to limit it to a maximum of 2 instruments in competition with each other. Sometimes you need more but when I have had feedback from other artists, the general consensus is always less is more because you can then make what is there more full and richer in tone.
The first thing I usually do is to high pass anything that has a focal point in the mids or highs. What is in the low end there is probably not necessary and will just add muddiness to your low end. Not good. In the same vain, you may want to low pass some of the mid-higher frequencies in the bass instruments so that it doesn't interfere with high end percussion of instrumentation.
However, this will not be enough to create great separation, you will still have to do some EQing to get the instruments occupying the same space to gel. I use a technique called frequency slotting to create that separation. Here's how it is done in a few steps...
- I will put a small and wide boost (probably 2db) in my EQ and sweep along to find the bit where the instrument sounds even more like that instrument. I'll note that frequency down and then do the same with the other instrument. There may be 2 or 3 spots where this is the case.
- Compare notes and see if they are in different places
- If they are in different places, I will put a small wide boost on one (1-2db) in the area that makes it sound more like that instrument and a small thin cut (again 1-2db) in the same space on the other instrument to give it some space to shine through at that frequency
- Then do this with the other instrument so they both have a (or maybe 2, max 3) boost(s) and cut(s) that correspond to each other
- Where they both have the same frequencies needed, I will just put a slight wide cut (1db) on both so they are not creating a peak in the sound there
Tip: do this in mono. This way any panning you have on there will not be giving you an artificial sense of separation. Mono forces them to live on top of each other so if you can get separation in mono, it'll sound beautiful when you put stereo back on. It's actually a beautiful moment so cherish it!
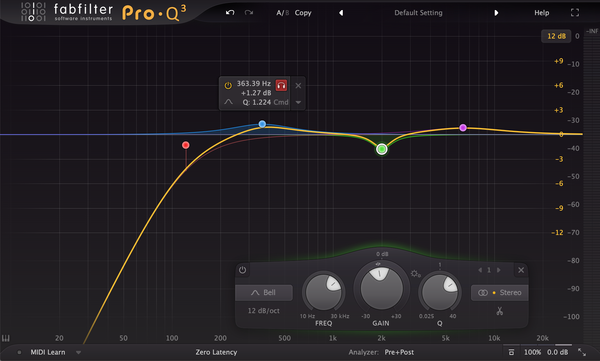
It should look like this...

What about when you have the same instruments?
This is a good question. It’s quite common that you’ll have 2 guitars for example - perhaps one is rhythm and the other is for solos. Now, solos can often be in a different octave meaning that they will naturally have different points of the frequency spectrum. However, they might not be in different octaves and, if that is the case, you just need to pick some areas to boost in one and cut in the other. Here are some tips for this:
- Lowering high end tends to make things sound further away. I'd keep the solo front and centre so I would have the high end cutting going on in the one that can be less prominent in the mix
- Presence for guitars tends to be in the 1-2k range so cuts you do here will push things back in the mix. Bare that in mind when thinking about which guitar to apply cuts to in this area
- Panning will do a lot to help you out here (I know this is about EQ but it has got to be said!)
- I would recommend putting a wide cut in the 200-600hz range so they don't create mud by sitting on top of each other
Challenging areas to pay particular attention to...
- 0-80hz is tricky because it is tough to hear unless you are in an acoustically treated space or have very expensive headphones. I have a blog coming soon on how to mix low end that will help you here. I'd also recommend checking out plugins by Mastering The Mix as they have some great tools for helping get this right in less than ideal environments.
- 350-500hz is tricky because almost every instrument out there has a cross over in this region. That means it can build up and sound muddy and undefined. Every so often, I will do an EQ sweep on the master bus in this region to see if there are any parts that jump out as much louder than others. I will then return to the instruments in this region and apply small cuts in the same spot. The width depends on the width of the problem when I am looking at the master bus.
Some takeaway tips...
- Think before you act. You always need to know what you're trying to achieve before you start with EQ. It can be a ball ache to unwind if you don't
- Do the different types of EQ in the order of this article. It tends to be easer to get the right tone when you have a clean sound. And it tends to be easier to create separation when you have got the tone right on a clean sound
- Give each EQ a name on your chain so you can remember what you were using it for if you return to it later!
- EQ for separation in mono
- Listen to reference tracks with similar instrumentation to help you understand whether you have the right tone and separation
- Subtle is normally better in separation but anything goes in tonal EQ
- Wide boosts and thin cuts are usually the most natural sounding
And that is everything I know about EQ and how I use it! Hope you find this useful!