Low end is everything in a mix. If you don’t get the low end right and tight, you won’t be able to balance the rest of the mix properly. It will just sound muddier than a Glastonbury reveller. And actually, for years, I used to overcompensate by adding a high shelf, which just made it harsh and hollow (due to relatively lower mid) on louder systems.
Here’s how I approach it nowadays…
A quick note on monitoring
You’ve probably heard that you need a good monitoring set up with acoustically treated surroundings to get this right. It’s definitely a lot easier but, if that’s not possible, invest in some plugins to help you. My golden boy is Reference by Mastering in the Mix as it helps me see how the balance compares to my references and I can also solo any band of my choosing to zero in on issues I may be facing.
With that out the way, let’s get to it. When I make it to the mixing stage, I always start with the low end - the kick and the bass. If you get these two gelling together like yin and yang, the rest becomes really simple - you have a clear anchor to work with.
1. Decide what lives where
Before I do anything, I have a think about what is going to be where. I tend to think of low end as having 3 sections to it.
- Sub (20-80hz)
- Low (80-120hz)
- Low-mid (120-300hz)
I produce Breakbeat with a glitch funk twist to it. I am also a fan of splitting out the main part of the bass from the sub part of the bass in my production so I have more control (more on this shortly). This means that my placement tends to be:
- Sub (20-80hz) - sub synth (sine or triangle)
- Low (80-120hz) - kick drum (this does have representation in the 50-80hz zone a lot too)
- Low-mid (130-300hz) - base synth
However, this might be different for different genres. For example, house music will have the kick occupy sections 1 and 2 and then have the bass sit on top of the kick. If you don’t know, load a similar track from a recording artist and sweep an EQ across those frequencies to see what the producer has done.
Arrangement tip: don’t put any more than a kick and a bass line into your low end. It’s hard enough to get it clean with just two instruments. Simple is better generally but this is especially true in the low end.
2. Analyse your sounds
Unfortunately, those instruments don’t always neatly fit into those boxes. In most cases they will smudge across all 3. In which case we need to figure out what sounds good at what frequency and what we could do without.
Kick
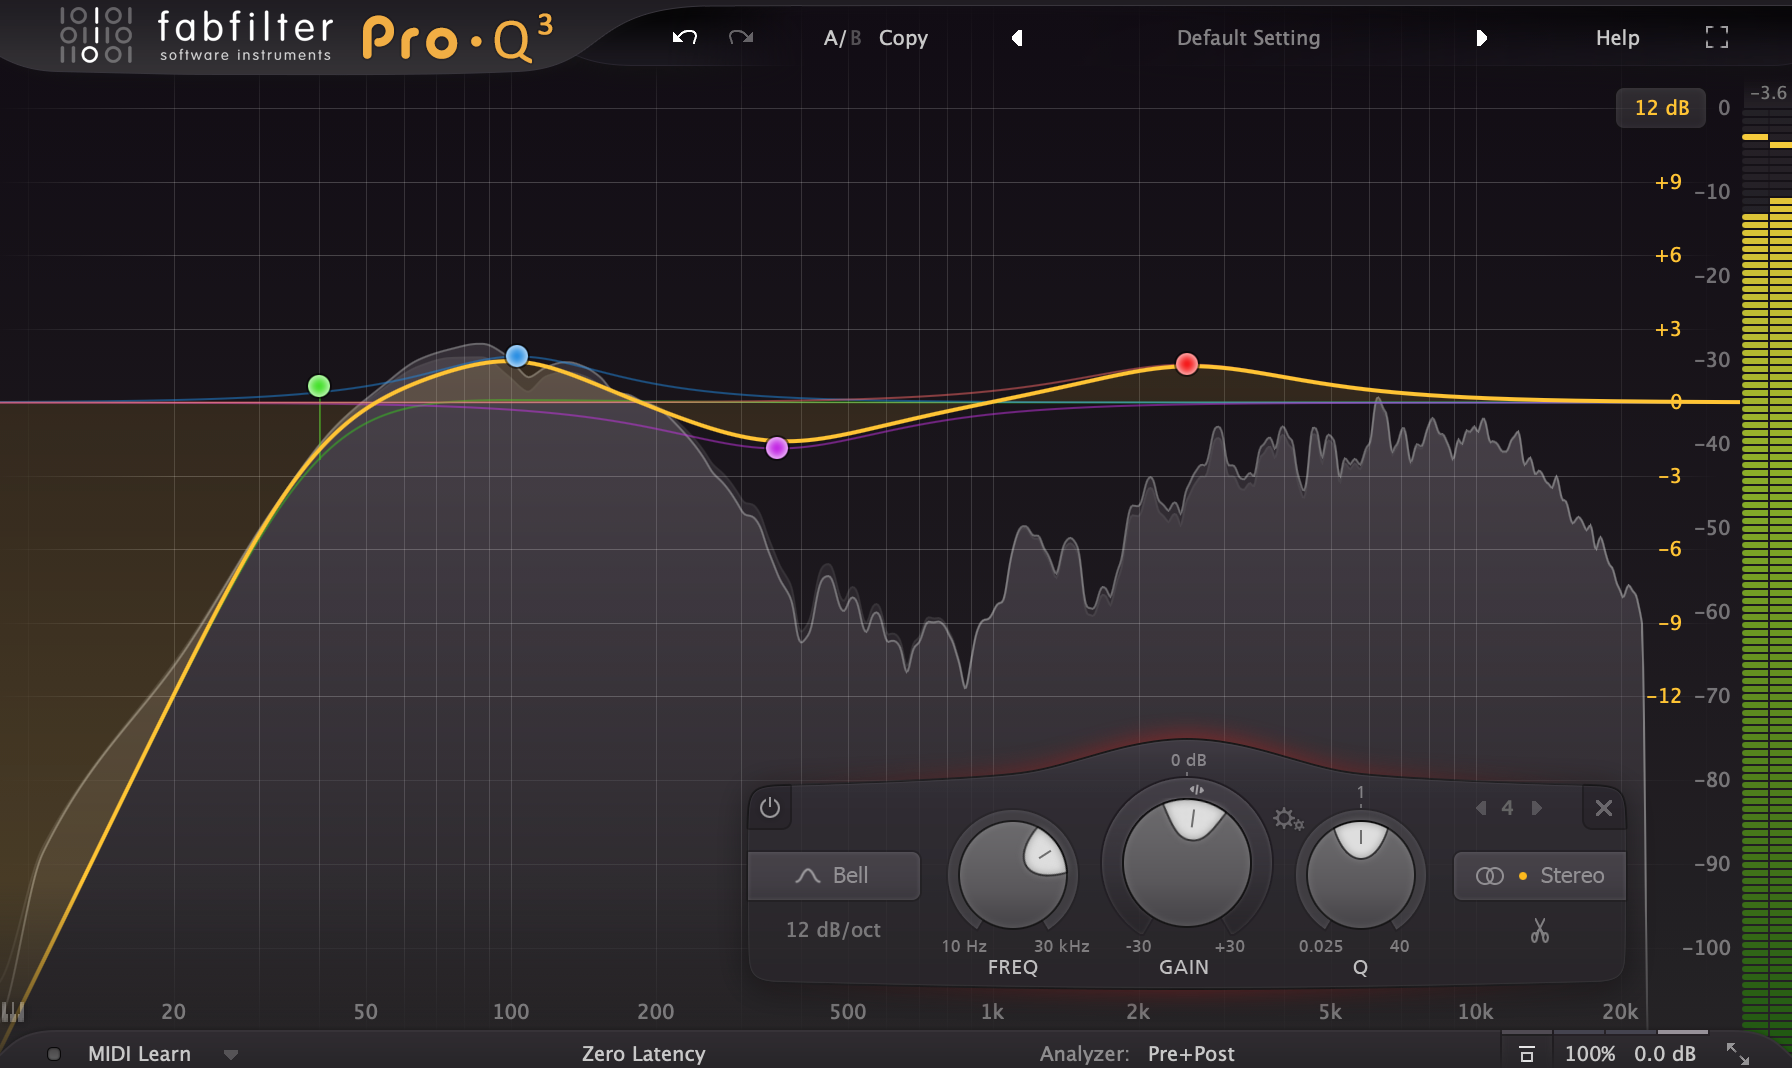
I usually start with the kick. You’ll want to use both your ears and your eyes for this. Take a look at the spectrum analyser and look for the peak (circa 80hz). That’s the fundamental and usually where all the chest wobbling punch comes from. Put a 3-5db cut into your EQ and sweep across the low end and listen for when the kick sounds crap and when it sounds okay (or even good). Note down these frequencies. Quite often, I find that I don’t need the lower end of the sub region (0-60hz) and I can take a pretty big scoop out of the low mids too (300-700hz). Not always so use your ears but you can probably start to see how this is useful.
Sub
My subs are usually built in a particular way.
- Triangle wave to have some additional harmonics (making it easier to hear on broader set of speakers)
- Saturation to further support the above
- Filter at 120hz (sub is everything below, bass is everything above). I use Ableton multiband dynamics to do this as it has an optimised crossover for this. Basically you put the multiband processor on the sub and on the bass sounds. On the sub you solo the low end and on the bass sounds you solo the mid and above. To do this second part, you have to turn off the high end and solo the mid. This effectively turns the mids and highs into one band.
Sub multiband dynamics plugin...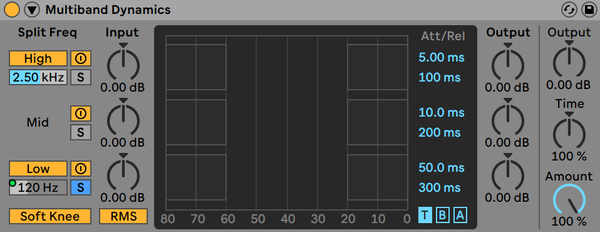
Bass multiband dynamics plugin...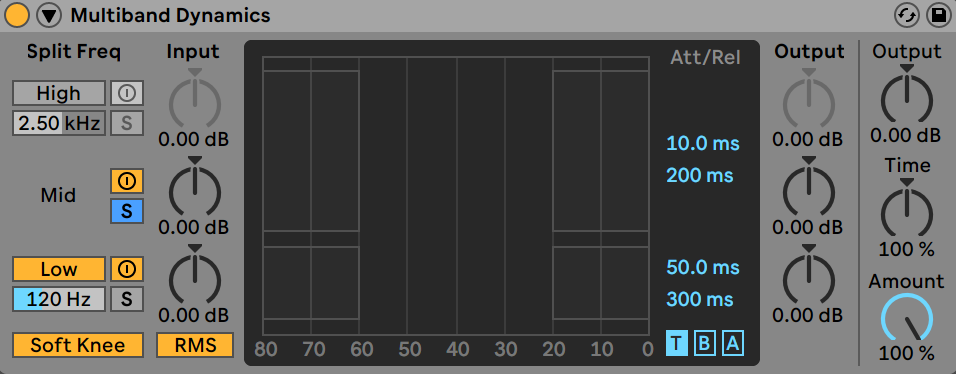
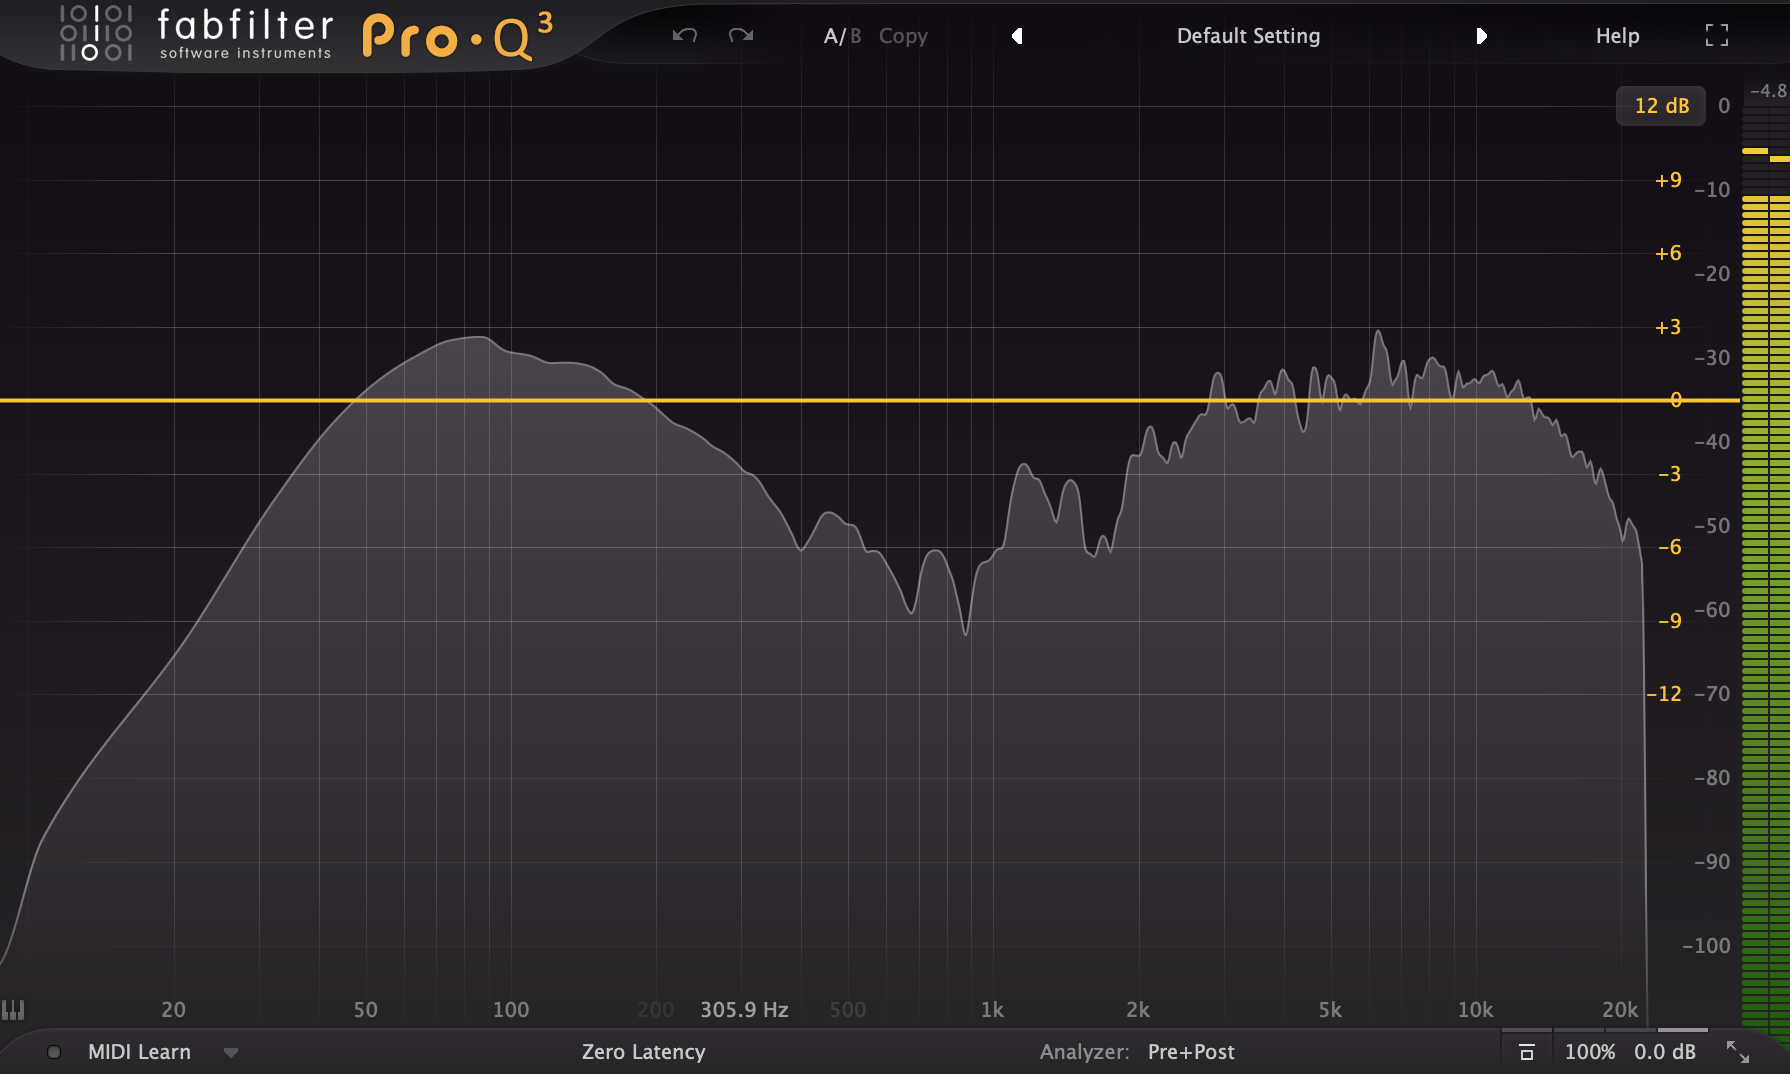
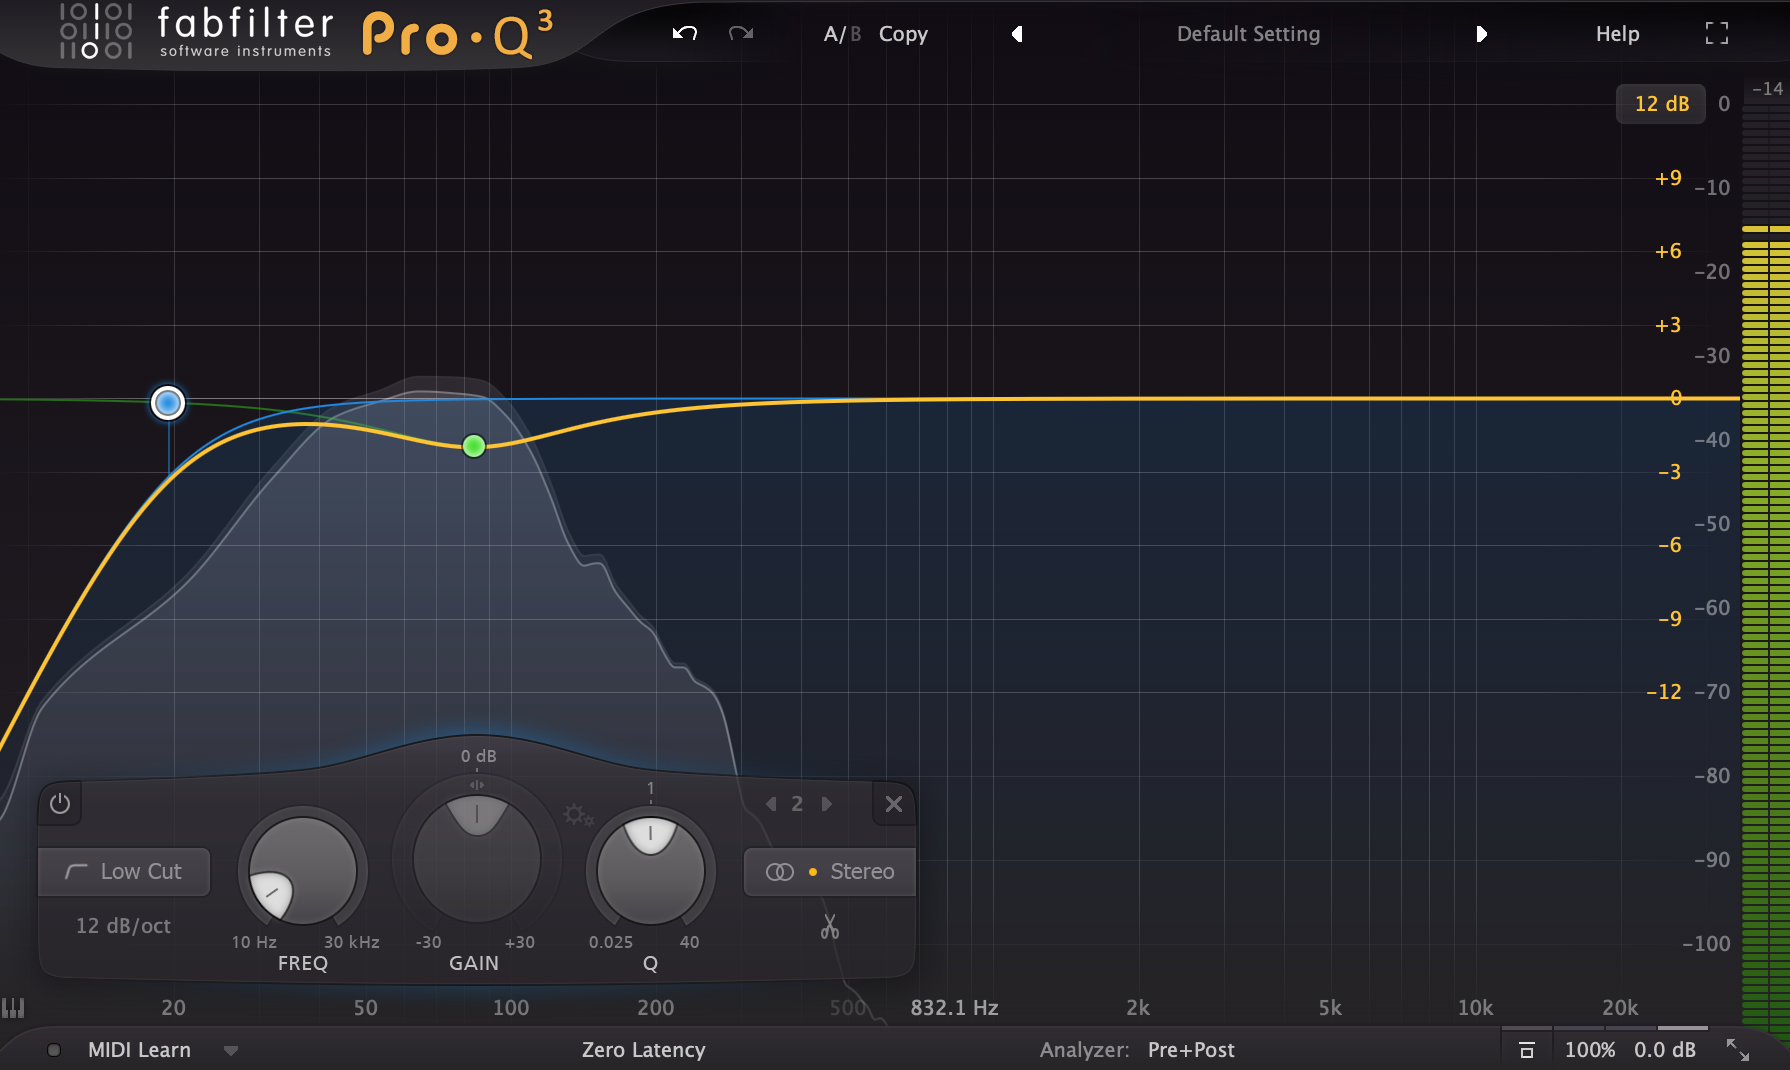
Again, this tends to be quite straightforward. In a spectrum analyser there will be a very clear peak. This will be important but also look for other peaks and sweep for where it sounds good or bad. Note these down. Just be conscious that you probably can’t hear it too well below 80hz.

Bass
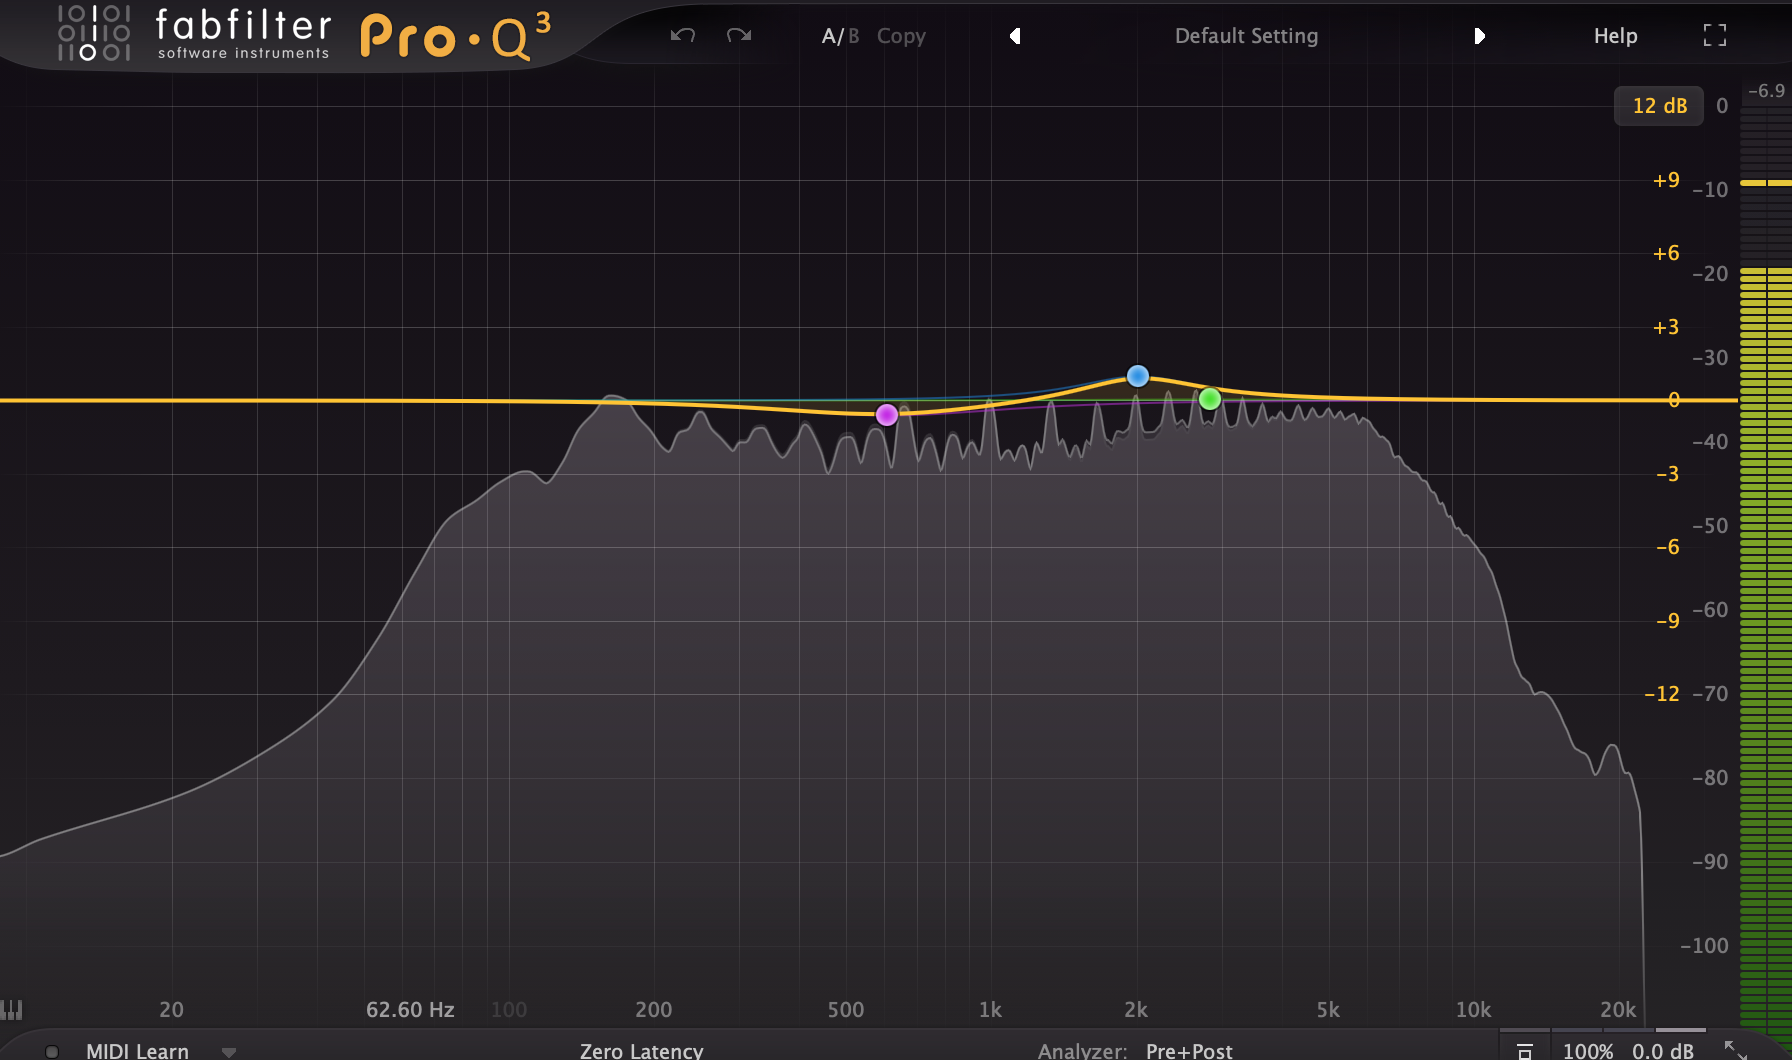
And finally the bass. In essence do the same. The below image was really just about shaping the mid and high end tone in this instance as the roll off created by the multiband dynamics trick covered me for the low end.
3. Compare notes and start cutting
If you stack your notes on top of each other, you’ll notice that there will be some areas that are relevant for one and not so important for others. The intention here is to, where the sounds cross over, boost the good stuff in one and notch out the corresponding spot on another (preferably in a space identified as being less important).
For example, the kick here is hitting at 80hz so we will notch out the 80hz mark on the sub. See how that sounds and then boost the 80hz region on the kick, if needed.
Sub:
 Kick:
Kick:
 Bass:
Bass:
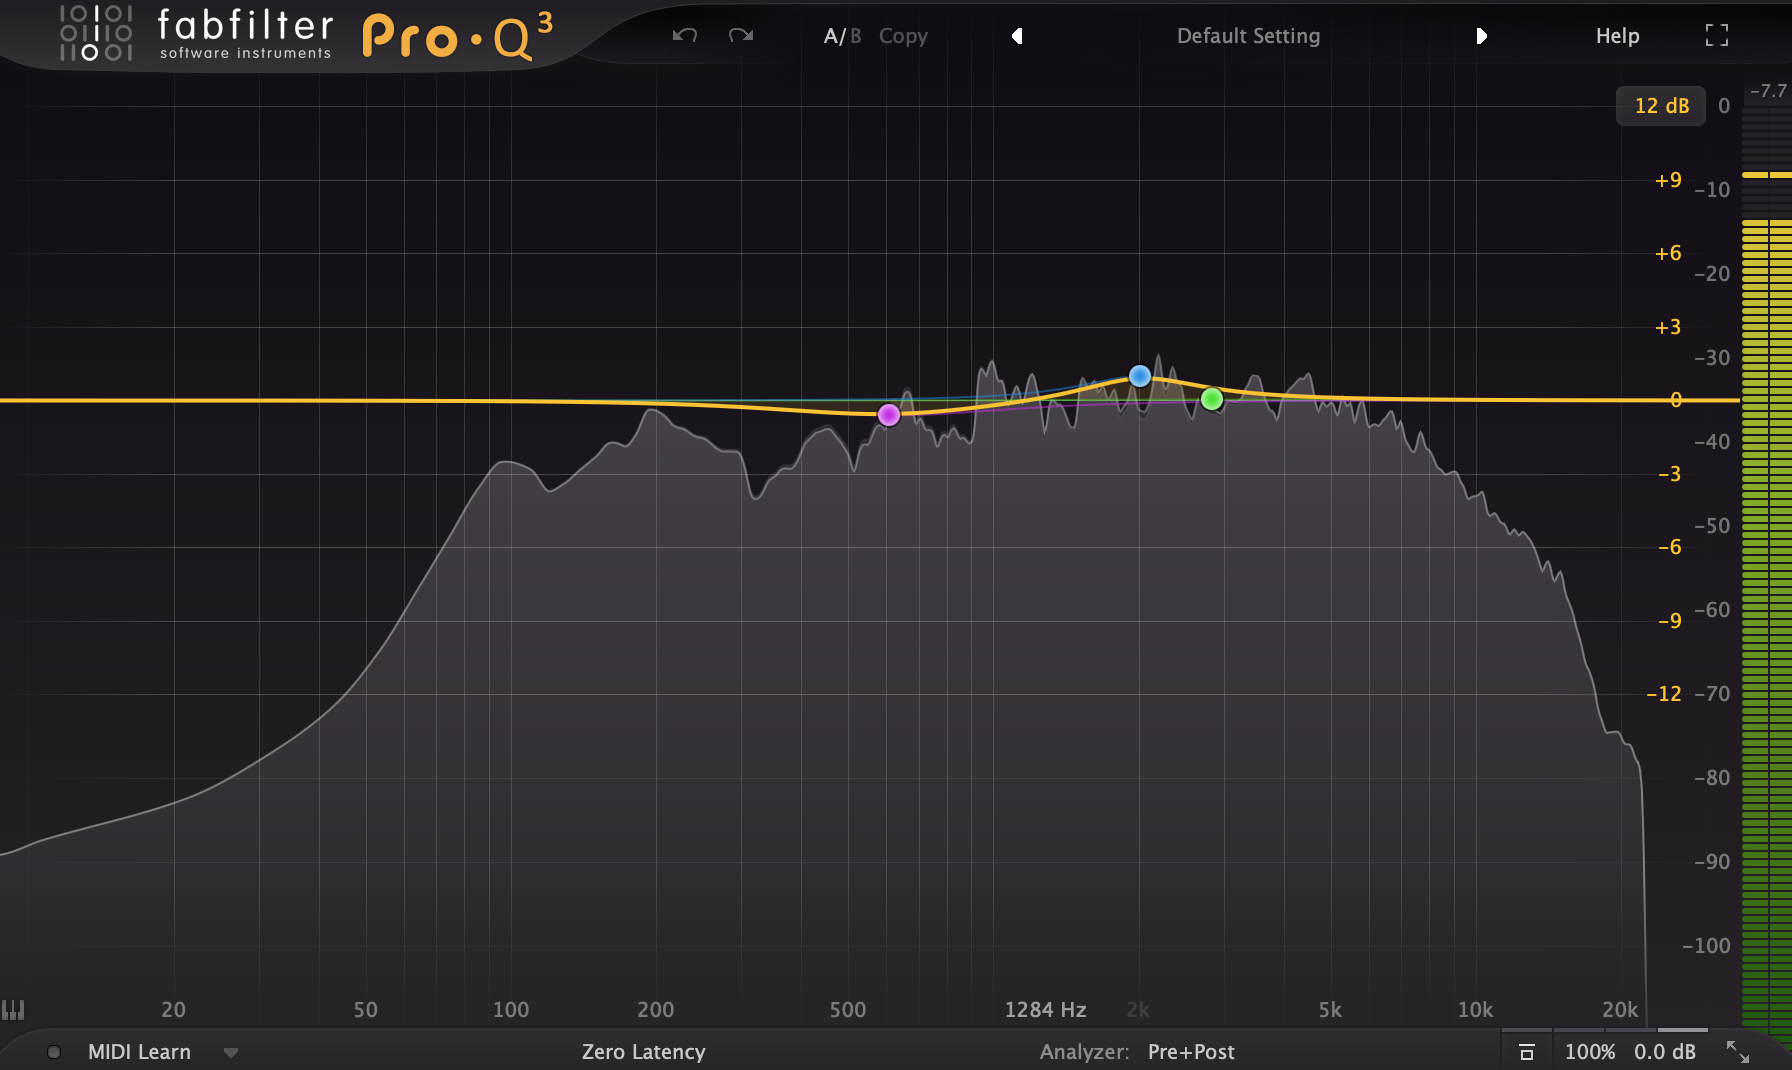 Note: the bass EQ here was about shaping tone. It sat well in the low end because I had scooped out some space in the kick from 300-700hz.
There are some rules I follow here:
- Notch a bit wider in the low end
- Start with a cut first. Go as far as 3-5db if you have to but stop there and try boosting the same spot in the other so that you’re not making huge differences to one sound alone
- Overdo it until you hear the difference you’re making and then dial back to taste. It’s quicker, easier and helps train your ears
- Don’t overthink it. 1-2 boost/notched areas should be enough - usually the fundamental and an overtone is enough. You don’t actually have a lot of space to do any more than that!
4. Review the volume balance
You should be able to hear the different bits more clearly now. I usually use this moment to see if the volume balance is right. As you can hear them all a bit more clearly, I’d fiddle with the volume to make sure they sound balanced. There is a volume trick you can try out with a Vu meter where you calibrate the meter so the kick (in solo) hits at -3db and then set the volume of the bass so the meter hits 0db when the kick and bass hit together (both soloed together). Why -3db and 0db? The addition of 3db essentially means that they are the same volume as sound doubles every 3db. I have tried this a few times before and it does work wonders, especially if I am completely stuck. Anyway, now is the moment to make sure you are happy with the volume.

5. Dynamics and compression
This rodeo ain’t over though. Tight low end that you can anchor a mix around and most importantly rock any dance floor with, has controlled consistent dynamics.
Dynamics are really, really important in the low end, especially if you want the mix to translate. Why? Because the low end is a common place for sound system designers to get creative with the EQ they install in the systems. If you have uneven dynamics, a boost here could throw your mix off and reintroduce a fart to your space suit.
Have a listen. Does anything poke out at all? Are any notes louder than others? Does the kick hit the same amount of hard? Focus there but being honest, it is super rare not to use compression on both the kick and the bass so probably a good idea to have your compressor in your bass bat belt.
Bass
Bass is a beast. It can take quite the beating from a compressor. Here are the things to think about:
- does my bass have a clicking sound at the beginning that is musically important? If so, a slower attack (5-20ms) might be best
- Is the issue a sharp attack/peak that needs taming? Or do I need the notes to sustain in a nice uniform fashion? The former requires a fast attack and fast release. The latter requires a longer release so that the compressor returns to 0db of gain reduction just as the note ends
- 5db of gain reduction is okay on bass. You may even need more
Worth noting that you’ll probably need more compression on a real bass than you will on a synthesised bass (depending on the envelopes you have set and the midi velocities of the actual clip). If it is a synth bass, you can always look to change the synth, rather than add compression.
Kick:
This is a complicated one as it is so dependent on the sample you’ve chosen. I also find find that it’s difficult to accept that the kick needs tucking in, rather than punching the daylights out of you. So here is how I approach it.
First, I listen to my reference track and ask the following questions:
- How loud is the beater of the kick compared to the sustain or body of the kick? A louder sustain is probably associated with a quick attack and slow release (returning to 0db at the end of each note)
- Does my kick thump as loud as their kick? I’ll normally use something to isolate the 0-200hz range to answer this question. I use a plugin called Reference by Mastering The Mix but you could use any multi-band compressor to do the same (solo the low end band). Just keep flicking between the reference and your track to work this out. If yours is punching too hard, apply some compression to quieten it down. Remember to consider both the sub and the beater parts. One might be perfectly balanced while the other is not. If this is the case, make sure whatever you do targets the issue and not the whole kick. Many compressors have high and low pass functionality. Just remember, if you high pass, it will sound more bassy. If you low pass, it will have more of a click/beater sound. If they are both out in the same way, try the volume fader instead!
Quick tip: I’d also take a look at the wave form. You can do this by setting up another channel and routing the master through to it. Record a short clip and take a look at whether the kick pokes noticeably out of the rest of the track (same with the snare while you are there). If it doesn’t, you need to apply some compression to control the peaks (that’s usually fast attack and fast release. Dial the attack up a little bit if that makes the kick sound dull)
6. Mother ducking side chain
And finally, if EQ and compression haven’t quite got you there, the finishing touch will be the use of sidechain compression to duck the bass when the kick hits. Make this subtle and it should be just enough to make everything crystal clear. My settings here are usually 2ms for the attack (letting a little bit of the transient of the bass through) and between 50-90ms release, depending on the sustain of the kick. To put that into context, most kicks in my music are over in 100-150ms so I am setting it such that the bass fills in as the kick fades away.

Some other considerations…
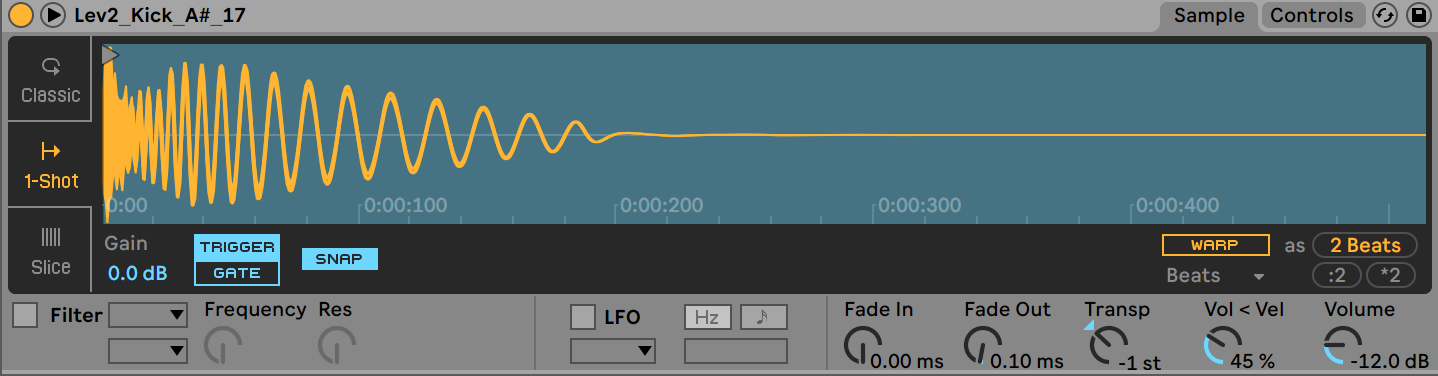
Decay of the kick
If it’s super muddy, take a look at how long your kick is. On Ableton, you can see this in the sampler in the drum rack. It’s along the bottom of the wave form. Try shortening the decay - sometimes that clears up the mud. This is more important the quicker the BPM as there is less space for a long kick sound.
Put them in mono
My kicks are almost always in mono. Same with my bass below 150hz. When you sum stereo to mono, phase issues can occur, which can affect the volume of the low end dramatically. Avoid this by making the low end mono in the first place and then you don’t have to worry about it. Mono matters because a lot of systems (even clubs and festivals) are in mono. How to do it? Either click the mono button on a utility plugin, or roll of the side below 150hz on a mid-side EQ.