This is a real buzz killer. I make a lot of my synths in headphones and as you raise that unison or spread dial, the result is lush. But as soon as you hit mono…
"damn! Where the frig is my synth!? Who is this sound thief and where does it live!?"
Mono compatibility is important because lots of clubs and festivals have mono systems. Online live shows can be mono and even some radios broadcast in mono. You don’t want your track sounding weak next to commercial tracks in front of a crowd do you? No.
This article is about retrospectively saving a mix but you should consider mono compatibility as you produce - always check what’s getting lost in mono when designing synths and using samples. This is even true of presets or one shot samples you have got hold of from reputable sound designers. Get in the habit of checking before you commit to using anything in your project. You’ll also need to check in the mix (not solo) as sometimes the damage isn’t obvious until it’s all in there together.
Tip: I put a utility plug-in at the end of the chain on my master and map the mono button to the letter “m” on my keyboard so I can toggle as I go.
These are the tricks I have found work regularly for different instruments.
Drums...
Hi hats - yes, it’s not just synths! Hi hats can be a ball ache too. My trick here is to just use the left or right side of the signal and then up the volume to get it back to where it was. You may have lost some verb from the original sample - so just add your own (reverb, delay, chorus) to bring that space back - make sure you toggle to mono as you add these effects. If you want to crate some stereo movement on this to give the listener some audio candy, try an auto panning effect. Because of the rhythmic nature, it can be effective at giving some width and space to hi hats as they move around the stereo field.
Kick - I always auction my kicks in mono and keep them there. I just wouldn’t bother with a kick that was stereo - too risky as even subtle changes to the kick in dance music can throw a mix out completely. In my experience mono below a threshold (say 500hz) is still risky as a lot of the punch of a kick drum is in the 2-5k range. However, the above trick would work in most circumstances if you found yourself there (not the autopanning, that would just be weird...). Just make sure any effects you apply after are high passed (probably a minimum of 300hz) to keep the low end centred and clean.
Snare - snares have a similar story. Lots of tracks warrant a snare with some stereo lushness at higher frequencies. In this instance I tend to keep the snare mono and then use a clap to create that stereo high frequency bit. Find a clap that works in mono, or use a mono one and use reverb/delay to give the width. You’ll thank me later.
Synths...
The focus below is on bass synths but these techniques work on pads and leads too. I usually try them in this order too as they get gradually more destructive.
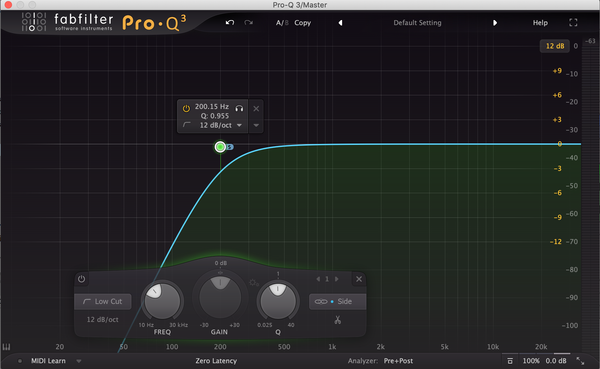
1. Mid-side roll off
first thing to do is roll off the side using a mid side EQ. 100-350hz to taste. See if that solves the problem first as it usually makes the sound cleaner, more powerful and clearer anyway (I do this on every bass I create). A lot of phase issues happen in the low end as the wavelength is longer so more audible. It's worth noting that bass is also harder to hear in most monitoring environments so this could be going on and you don't know it until you hit the club and your track sounds weak and undefined (like me at a body building competition).
2. Locate the problem, turn it off and try a different method
Next, I look for what could be causing it and then see if there is another way to skin the cat. Typical culprits are:
- Unison
- Chorus
- Hyper/dimension
- Reverb/delay
Turn each one on/off to see which one is causing the problem. If it’s an effect like chorus, try removing it from the synth and then running it in parallel with a high pass just before the wet channel. The high end is less likely to phase badly and can be enough to give you the width illusion.
If it’s unison, turn to 1 and try adding parallel chorus instead (using the above high pass).

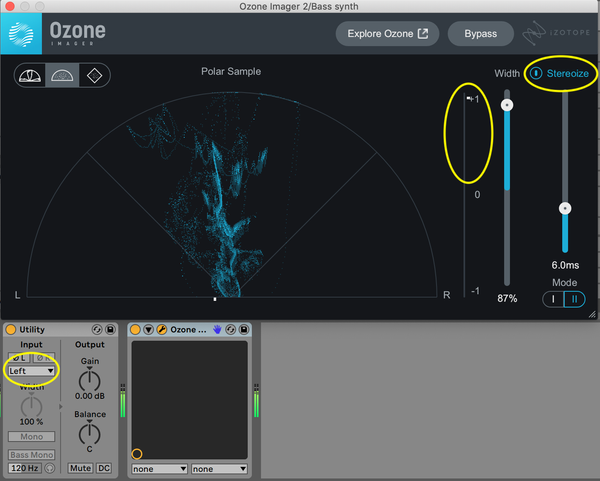
3. Take one side and stereoise
If that doesn’t work, audition the left and right sides on a utility plugin (see below pic). Choose the one that sounds the best and then add a stereo widener effect like ozone imager (free) to give it that width. You can look at the correlometer (must stay between 0 and +1, preferably as close to +1 as possible) to make sure you aren’t running into trouble as you apply the stereoize effect.
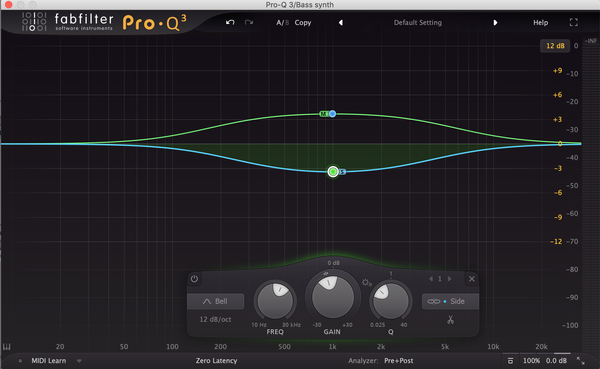
4. Cut the side, boost the mid
Another one to try is to do a wide cut across the mid frequencies in side mode and an equivalent boost in mid mode. If you’re phase issues are in this area, this can be enough to retain the timbre but reduce the difference between mono and stereo.
5. Duplicate and change one side slightly
My last resort is to take the synth I have, remove all the bits making it sound bad in mono and allocate this synth to the left (pan 30-50 depending on how wide I want the end product).
I then duplicate it and assign this to the right (pan 30-50 again).
Then I go into the right hand synth and change some of the processing. If it is a wavetable synth, I will choose a different wavetable with a similar harmonic structure to it. If it is an FM synth, I'll introduce a bit more FM (on an existing line, or adding another). If it is a subtractive synth, I will likely process the effects on it differently, or EQ it differently.
You'll have to experiment here as it could be all of those things together that gives you the sound you want. However, this works really well as the reason for the phase cancellation is because the signals are very similar, if not the same. This approach changes that but because of the panning gives you a massive sense of width. You might know that they are different because of what you started with but your listener won't have the foggiest.
I hope this helps keep that sound thief away.